How to Compile Linux kernel

There were 22 Billion internet connected devices in the world at the end of 2018. Therefore much more total computing devices including the ones that are not connected. Plus, by 2024 the number must be substantially higher. These devices run various programs written in different programming languages. Some run boring mainframe code, while others run trendy AI and ML models. Something really really fundamental to all these devices is that they run an OS – an Operating System. Majority of them run Linux. Lets go back to basics today and do something really fundamental. Let’s learn how to compile Linux kernel.

Step 1: Install Dependencies Before compiling the kernel, you’ll need to install some dependencies. These may include development tools, compilers, and libraries. The required packages vary depending on your distribution. For example, on Debian-based systems, you can install the necessary packages with the following command:

sudo apt-get install build-essential libncurses-dev bison flex libssl-dev libelf-dev

Step 2: Download the Kernel Source Code You can download the kernel source code from the official Linux kernel website (https://www.kernel.org/). Choose a long term supported version e.g. linux-6.6.24.tar.xz and download the corresponding tarball.

Step 3: Extract the Source Code Navigate to the directory where you downloaded the tarball and extract it using the following command:

tar xvf linux-6.6.24.tar.xz

Step 4: Configure the Kernel Change into the kernel source directory:

cd linux-6.6.24
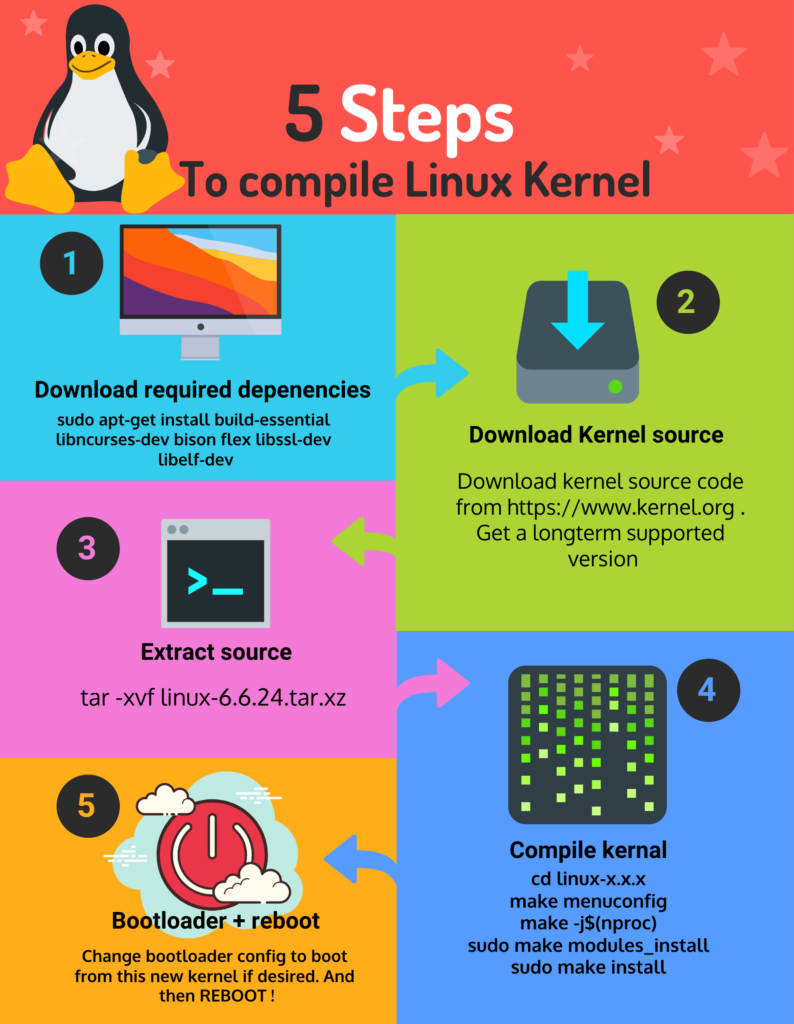
Steps to compile Linux kernel

Run the following command to start the kernel configuration:

make menuconfig

This command opens a text-based menu where you can configure various kernel options. You can navigate through the menu using the arrow keys and select options using the spacebar. Once you’re done configuring, save your changes and exit the menu.

Compile the Kernel Once you’ve configured the kernel, you’re ready to compile it. Run the following commands:

make -j$(nproc)

This command starts the compilation process. The “-j$(nproc)” option tells make to use as many parallel processes as there are CPU cores, which can speed up the compilation process significantly.

Install the Kernel Modules After the compilation is complete, you can install the kernel modules using the following command:

sudo make modules_install

Install the Kernel To install the newly compiled kernel, run the following command:

sudo make install

This command installs the kernel image, kernel modules, and other necessary files.

Step 5: Update Boot Loader Configuration Finally, you need to update your boot loader configuration to include the new kernel. The procedure for doing this varies depending on your boot loader (e.g., GRUB, LILO).

Reboot Once you’ve updated the boot loader configuration, reboot your system to boot into the newly compiled kernel.

That’s it! You’ve successfully compiled and installed the Linux kernel.

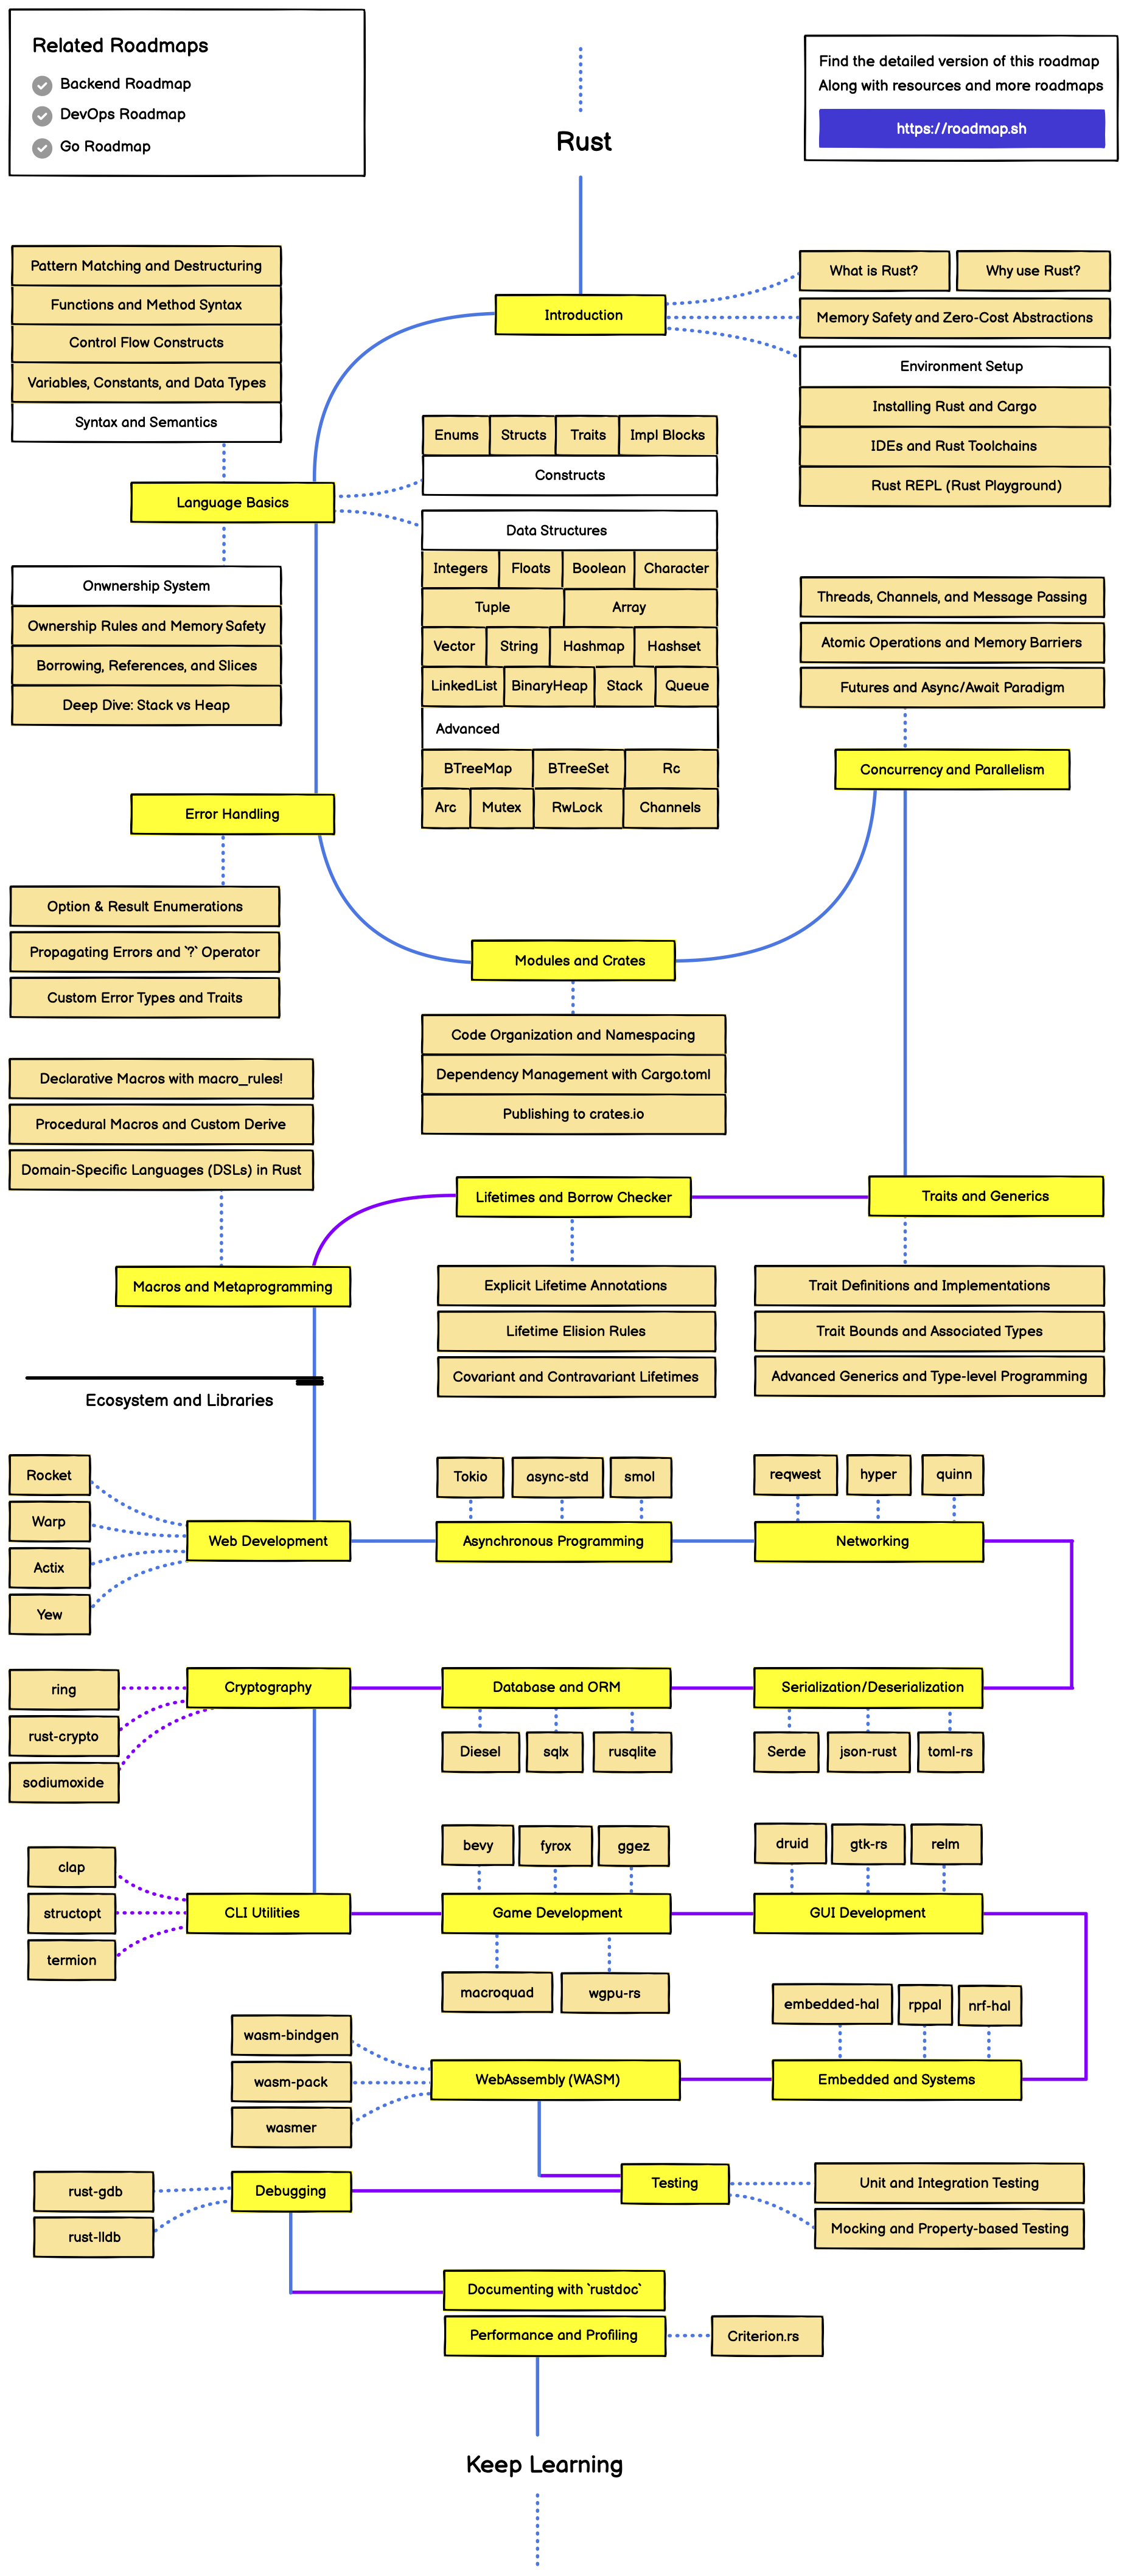
Rust Programming Language learning roadmap

Rust is a multi-paradigm, general-purpose programming language exploding in popularity. But what makes it special? Rust offers a unique blend of blazing speed, unparalleled memory safety, and powerful abstractions, making it ideal for building high-performance, reliable systems. This blog delves into the Rust Programming Language learning roadmap

Why Embrace Rust?

  • Unmatched Performance: Rust eliminates the need for a garbage collector, resulting in lightning-fast execution and minimal memory overhead. This makes it perfect for resource-constrained environments and applications demanding real-time responsiveness.
  • Rock-Solid Memory Safety: Rust enforces memory safety at compile time through its ownership system. This eliminates entire classes of memory-related bugs like dangling pointers and use-after-free errors, leading to more stable and secure software.
  • Zero-Cost Abstractions: Unlike some languages where abstractions incur performance penalties, Rust achieves powerful abstractions without sacrificing speed. This allows you to write expressive, concise code while maintaining peak performance.

Language Fundamentals: Understanding the Building Blocks

Syntax and Semantics: Rust borrows inspiration from C-like languages in its syntax, making it familiar to programmers from that background. However, Rust’s semantics are distinct, emphasizing memory safety through ownership and immutability by default.

Constructs and Data Structures: Rust offers a rich set of control flow constructs like if, else, loop, and while for building program logic. Data structures encompass primitive types like integers, booleans, and floating-point numbers, along with powerful composite types like arrays, vectors, structs, and enums.

Ownership System: The Heart of Rust

The ownership system is the cornerstone of Rust’s memory safety. Let’s delve deeper:

  • Ownership Rules: Every value in Rust has a single owner – the variable that binds it. When the variable goes out of scope, the value is automatically dropped, freeing the associated memory. This ensures memory is never left dangling or leaked.
  • Borrowing: Borrowing allows temporary access to a value without taking ownership. References (&) and mutable references (&mut) are used for borrowing. The borrow checker, a powerful Rust feature, enforces strict rules to prevent data races and ensure references always point to valid data.
  • Stack vs. Heap: Understanding these memory regions is crucial in Rust. The stack is a fixed-size memory area used for local variables and function calls. It’s fast but short-lived. The heap is a dynamically allocated memory region for larger data structures. Ownership dictates where data resides: stack for small, short-lived data, and heap for larger, long-lived data.

Rust programming language learning roadmap

Beyond the Basics: Advanced Features

  • Error Handling: Rust adopts an Result type for error handling. It represents either successful computation with a value or an error with an error code. This promotes explicit error handling, leading to more robust code.
  • Modules and Crates: Rust promotes code organization through modules and crates. Modules group related code within a source file, while crates are reusable libraries published on https://crates.io/.
  • Concurrency and Parallelism: Rust provides mechanisms for writing concurrent and parallel programs. Channels and mutexes enable safe communication and synchronization between threads, allowing efficient utilization of multi-core processors.
  • Traits and Generics: Traits define shared behaviors for different types, promoting code reusability. Generics allow writing functions and data structures that work with various types, enhancing code flexibility.
  • Lifetimes and Borrow Checker: Lifetimes specify the lifetime of references in Rust. The borrow checker enforces rules ensuring references are valid for their intended usage duration. This prevents data races and memory unsafety issues.

Rust’s Reach: Applications Across Domains

  • Web Development: Frameworks like Rocket and Actix utilize Rust’s speed and safety for building high-performance web services and APIs.
  • Asynchronous Programming: Async/await syntax allows writing non-blocking, concurrent code, making Rust perfect for building scalable network applications.
  • Networking: Libraries like Tokio provide efficient tools for building networking applications requiring low latency and high throughput.
  • Serialization and Deserialization: Rust’s data structures map well to various data formats like JSON and CBOR, making it suitable for data exchange tasks.
  • Databases: Several database libraries like Diesel offer safe and performant database access from Rust applications.
  • Cryptography: Rust’s strong typing and memory safety make it ideal for building secure cryptographic systems.
  • Game Development: Game engines like Amethyst leverage Rust’s performance and safety for creating high-fidelity games.
  • Embedded Systems: Rust’s resource-efficiency and deterministic memory management make it a compelling choice for resource-constrained embedded systems.

Image Credit : roadmap.sh

BERYL – new breakthrough Acoustic Echo Cancellation by Meta

I attended Meta’s RTC@Scale 2024 Conference where Meta talked about two new major changes that it accomplished while revamping the audio processing core stack. BERYL – new breakthrough Acoustic Echo Cancellation by Meta and MLOW – a new low bitrate audio codec fully written in software. this blog contains notes on Beryl. PDF of handwritten notes can be found here.

BERYL -full software AC (by Sriram Srinivasan & Hoang Do)

  • META did 20% reduction in “No Audio” or “Audio device reliability” issue on iOS & Android
  • 15% reduction in P50 mouth to ear latency on Android
  • Revamp of Audio processing stack core for WhatsApp, Instagram messenger
    • Very diverse user base
    • Different kinds of handsets
    • Different Geography
    • Noisy conditions
    • Both high end & Low end phones (more than 20% low end ARMV7)
  • Based on telemetry and user feedback Meta decided to tackle 1. ECHO and 2. Audio Quality under low bit rate network
  • High end devices use ML to suppress echo
  • To accommodate low end devices which cannot run ML, a baseline solution for echo cancellation is needed
  • Welcome BERYL
  • Bery/replaces WebRTC‘s AEC3, AECM on all devices
  • Interestingly users experiencing echo issues are also on low end devices which cannot run ML
  • Meta’s scale is too larger
    • High end phones have hardware AEC
    • Low end phones do not
    • Stereo I spatial audio only possible in s/w
    • H/w only does mono AEC
  • Beryl was needed because AM either leaves lot of residual echo or degrades quality of double-talk
  • AECM – Not scalable for millions of users & Quality not best
  • Beryl AEC = Low compute – DSP based s/w AEC
    • Lite mode for low end devices
    • Full made for high end
    • Both modes adaptive vs. ACT being simple echo suppressor
    • Near instant adaptation to changes
    • Better double talk performance
    • Multi-channel capture & render l6k1tz & 48 kHz
    • Tuned using 3000 music t speech (monot stereo on 20T devices
    • CPU usage increase of less than 7% compared to WebRTC AEC

Beryl Components

1. Delay Estimator

  • Clock drift when using external mic & speaker as they do not share common clock
  • Delay estimator, estimates delay between far- end reference signal (speaker) & near end capture signals (mic)
  • Beryl full made can handle non-causal delays (-ve delay)
  • Can handle delay up to 1 sec

2 Linear AEC

  • Estimate echo & subtract from capture signal
  • Beryl AEC is normalized least mean squared (NLMS) frequency domain dual filter algo
  • One fixed & one adaptive filter
  • Coefficients can be copied between filters
    • relative difference in the powers of error signal between two filters and input mic signal
    • Coupling factor between echo estimate E error signal *
  • Adaptation step size is configurable I depends on coherence between mic & reference signals, power and SIR
  • Great double talk performance compared to WebRTC AEC

3 Acoustic Echo Suppressor (AES)

  • Non linear distortions are introduced by amplifiers before speaker and after microphone
  • AES removes this non-linear echo (residual echo)
  • AES removes stationary echo noise, distortion, applies perceptual filtering & ambient noise matching

Implementation

  • Reduce memory, CPU & latency
  • Synchronization needed due to work on audio from input & output devices from different threads
    • mutex in functions (Good safety but worse real time performance)
    • Low level locks on shared data structures
    • Thread safe low level data structures (ok safety, great realtime Performance)
  • Neon on ARMY7 & ARMG4
  • AUX on Intel
  • CPU 4110% of WebRTC AEC

Demystifying WebRTC

WebRTC (Web Real-Time Communication) has revolutionized the way web applications handle communication. It empowers developers to embed real-time audio, video, and data exchange functionalities directly within web pages and apps, eliminating the need for plugins or additional downloads. This blog’s attempts in demystifying WebRTC is the first step in learning the basics of this technology.

Signaling: The Orchestrator of Connections

WebRTC itself doesn’t establish direct connections between browsers. Signaling, the first act in the WebRTC play, takes center stage. It involves exchanging information about the communication session between peers. This information typically includes:

  • Session Description Protocol (SDP): An SDP carries details about the media streams (audio/video) each peer intends to send or receive, along with the codecs they support.
  • ICE Candidates: These describe the network addresses and ports a peer can use for communication.
  • Offer/Answer Model: The initiating peer sends an SDP (offer) outlining its capabilities. The receiving peer responds with an SDP (answer) indicating its acceptance and potentially modifying the offer.

Several signaling mechanisms can be employed, including WebSockets, Server-Sent Events (SSE), or even custom solutions. The choice depends on the application’s specific needs and desired level of real-time interaction.

NAT Traversal: Hurdles and Leapfrogs

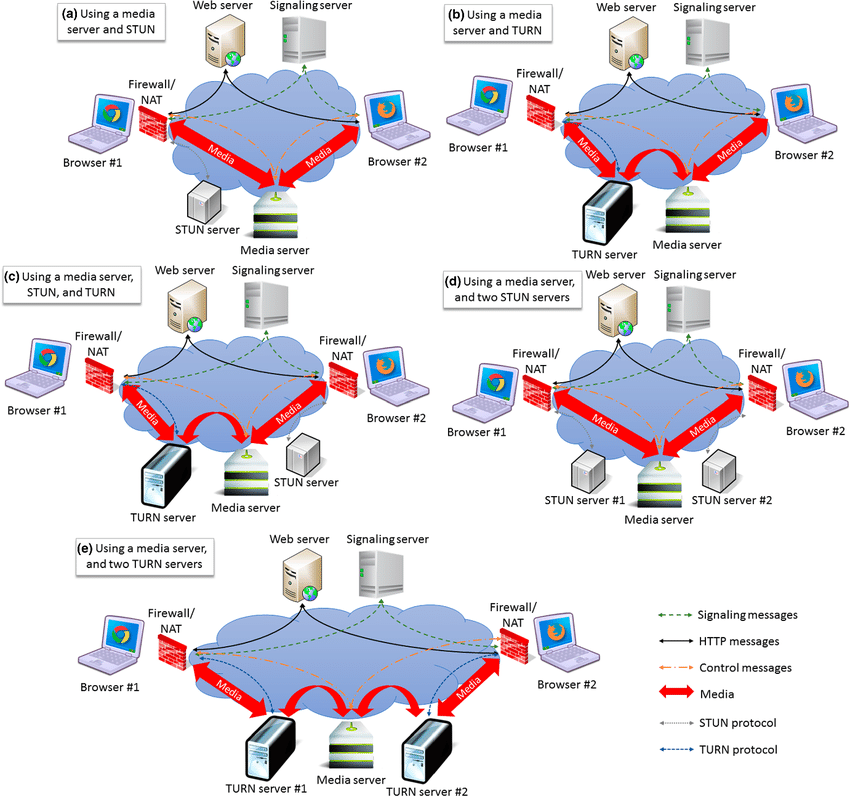
WebRTC connections often face the obstacle of Network Address Translation (NAT). NAT devices on home networks hide private IP addresses behind a single public address. Direct communication between peers behind NATs becomes a challenge. WebRTC employs a combination of techniques to overcome this hurdle:

  • STUN (Session Traversal Utilities for NAT): A peer sends a STUN request to a public server, which reveals the public IP and port the NAT maps the request to. This helps a peer learn its own public facing address.
  • TURN (Traversal Using Relays around NAT): When a direct connection isn’t feasible due to restrictive firewalls, TURN servers act as relays. Peers send their media streams to the TURN server, which then forwards them to the destination peer. While TURN provides a reliable fallback, it introduces latency and may not be suitable for bandwidth-intensive applications.
NAT traversal in WebRTC

NAT Traversal in webRTC

Image Credit : García, Boni & Gallego, Micael & Gortázar, Francisco & Bertolino, Antonia. (2019). Understanding and estimating quality of experience in WebRTC applications. Computing. 101. 10.1007/s00607-018-0669-7.

ICE: The Candidate for Connectivity

The Interactive Connectivity Establishment (ICE) framework plays a pivotal role in NAT traversal. Here’s how it works:

  1. Gathering Candidates: Each peer gathers potential connection points (local IP addresses and ports) it can use for communication. These include public addresses obtained via STUN and local network interfaces.
  2. Candidate Exchange: Peers exchange their gathered candidates with each other through the signaling channel.
  3. Connectivity Checks: Each peer attempts to establish a connection with the other using the received candidates. This might involve trying different combinations of local and remote candidates.
  4. Best Path Selection: Once a successful connection is established, the peers determine the optimal path based on factors like latency and bandwidth.

SDP: The Session Description

The Session Description Protocol (SDP) acts as a blueprint for the WebRTC session. It’s a text-based format that conveys essential information about the media streams involved:

  • Media types: Whether it’s audio, video, or data communication.
  • Codecs: The specific compression formats used for encoding and decoding media.
  • Transport protocols: The underlying protocols used for media transport (e.g., RTP for real-time data).
  • ICE candidates: The potential connection points offered by each peer.

The SDP is exchanged during the signaling phase, allowing peers to negotiate and agree upon a mutually supported configuration for the communication session.

v=0 
o=- 487255629242026503 2 IN IP4 127.0.0.1 
s=- 
t=0 0 

a=group:BUNDLE audio video 
a=msid-semantic: WMS 6x9ZxQZqpo19FRr3Q0xsWC2JJ1lVsk2JE0sG 
m=audio 9 RTP/SAVPF 111 103 104 9 0 8 106 105 13 126 
c=IN IP4 0.0.0.0

a=rtcp:9 IN IP4 0.0.0.0 
a=ice-ufrag:8a1/LJqQMzBmYtes 
a=ice-pwd:sbfskHYHACygyHW1wVi8GZM+ 
a=ice-options:google-ice 
a=fingerprint:sha-256 28:4C:19:10:97:56:FB:22:57:9E:5A:88:28:F3:04:
   DF:37:D0:7D:55:C3:D1:59:B0:B2:81 :FB:9D:DF:CB:15:A8 
a=setup:actpass 
a=mid:audio 
a=extmap:1 urn:ietf:params:rtp-hdrext:ssrc-audio-level 
a=extmap:3 http://www.webrtc.org/experiments/rtp-hdrext/abs-send-time 

a=sendrecv 
a=rtcp-mux 
a=rtpmap:111 opus/48000/2 
a=fmtp:111 minptime=10 
a=rtpmap:103 ISAC/16000 
a=rtpmap:104 ISAC/32000 
a=rtpmap:9 G722/8000 
a=rtpmap:0 PCMU/8000 
a=rtpmap:8 PCMA/8000 
a=rtpmap:106 CN/32000 
a=rtpmap:105 CN/16000 
a=rtpmap:13 CN/8000 
a=rtpmap:126 telephone-event/8000 

a=maxptime:60 
a=ssrc:3607952327 cname:v1SBHP7c76XqYcWx 
a=ssrc:3607952327 msid:6x9ZxQZqpo19FRr3Q0xsWC2JJ1lVsk2JE0sG 9eb1f6d5-c3b246fe
   -b46b-63ea11c46c74 
a=ssrc:3607952327 mslabel:6x9ZxQZqpo19FRr3Q0xsWC2JJ1lVsk2JE0sG 
a=ssrc:3607952327 label:9eb1f6d5-c3b2-46fe-b46b-63ea11c46c74 
m=video 9 RTP/SAVPF 100 116 117 96 

c=IN IP4 0.0.0.0 
a=rtcp:9 IN IP4 0.0.0.0 
a=ice-ufrag:8a1/LJqQMzBmYtes
a=ice-pwd:sbfskHYHACygyHW1wVi8GZM+ 
a=ice-options:google-ice 

a=fingerprint:sha-256 28:4C:19:10:97:56:FB:22:57:9E:5A:88:28:F3:04:
   DF:37:D0:7D:55:C3:D1:59:B0:B2:81 :FB:9D:DF:CB:15:A8 
a=setup:actpass 
a=mid:video 
a=extmap:2 urn:ietf:params:rtp-hdrext:toffset 
a=extmap:3 http://www.webrtc.org/experiments/rtp-hdrext/abs-send-time

a=sendrecv 
a=rtcp-mux 
a=rtpmap:100 VP8/90000 
a=rtcp-fb:100 ccm fir 
a=rtcp-fb:100 nack 
a=rtcp-fb:100 nack pli 
a=rtcp-fb:100 goog-remb 
a=rtpmap:116 red/90000 
a=rtpmap:117 ulpfec/90000 
a=rtpmap:96 rtx/90000 

a=fmtp:96 apt=100 
a=ssrc-group:FID 1175220440 3592114481 
a=ssrc:1175220440 cname:v1SBHP7c76XqYcWx 
a=ssrc:1175220440 msid:6x9ZxQZqpo19FRr3Q0xsWC2JJ1lVsk2JE0sG
   43d2eec3-7116-4b29-ad33-466c9358bfb3 
a=ssrc:1175220440 mslabel:6x9ZxQZqpo19FRr3Q0xsWC2JJ1lVsk2JE0sG 
a=ssrc:1175220440 label:43d2eec3-7116-4b29-ad33-466c9358bfb3 
a=ssrc:3592114481 cname:v1SBHP7c76XqYcWx 
a=ssrc:3592114481 msid:6x9ZxQZqpo19FRr3Q0xsWC2JJ1lVsk2JE0sG
   43d2eec3-7116-4b29-ad33-466c9358bfb3 
a=ssrc:3592114481 mslabel:6x9ZxQZqpo19FRr3Q0xsWC2JJ1lVsk2JE0sG 
a=ssrc:3592114481 label:43d2eec3-7116-4b29-ad33-466c9358bfb3

SDP Example

Security: Guarding the Communication Channel

WebRTC prioritizes secure communication. Two key protocols ensure data integrity and confidentiality:

  • Secure Real-time Transport Protocol (SRTP): SRTP encrypts the media content (audio/video) being transmitted between peers. This safeguards the content from eavesdroppers on the network.
  • Datagram Transport Layer Security (DTLS): DTLS secures the signaling channel, protecting the SDP and ICE candidates exchanged during session establishment. It establishes a secure connection using digital certificates and encryption.

SCTP: Streamlining Data Delivery

While WebRTC primarily relies on RTP for media transport, it also supports the Stream Control Transmission Protocol (SCTP). SCTP offers several advantages over RTP:

  • Ordered Delivery: SCTP guarantees the order in which data packets are delivered, which is crucial for reliable data communication.
  • Multihoming: A peer can use multiple network interfaces with SCTP, improving reliability and redundancy.
  • Partial Reliability: SCTP allows selective retransmission of lost packets, improving efficiency.

WebRTC might look complex to a beginner, however it is not a new technology. It is infact combination of existing protocols, codecs, networking mechanisms and transport to enable two clients behind firewall start a P2P session to exchange media and data. The beauty of WebRTC is displayed in two humans able to exchange the bond of love despite being continents apart. Lookout for future blogs for more on this amazing technology.

Bibliography:

NTP – Network Time Protocol

In the ever-evolving landscape of technology, precision in timekeeping is the silent force that synchronizes the digital world. Behind the scenes of our daily digital interactions lies a network of intricate systems working tirelessly to ensure that every device, every transaction, and every communication is precisely timed. At the heart of this network is NTP – the Network Time Protocol.

Origins and Innovator

NTP was conceived in the early 1980s by Dr. David L. Mills, a visionary computer scientist and professor at the University of Delaware. His pioneering work in the field of computer networking laid the foundation for modern time synchronization protocols. Dr. Mills envisioned NTP as a solution to the challenges of accurately maintaining time across distributed networks. Dr. Mills passed away on January 17, 2024 at the age of 85.

Satellites and Precision

Satellites play a crucial role in NTP by providing a reliable and precise time reference. GPS satellites, with their atomic clocks and synchronized signals, serve as an indispensable source for accurate timekeeping. NTP receivers utilize these signals to synchronize their internal clocks, ensuring precise timekeeping even in remote locations. This enables users to determine the time to within 100 billionths of a second.

Implementation and Open Source

NTP’s design and implementation are open source, fostering collaboration and innovation within the community. Popular implementations like the classic NTP reference implementation and the newer Chrony offer robust features and optimizations for various use cases. Let’s delve into some code snippets to understand how NTP can be used in languages like C++ and Rust.

C++ Project on Github

https://github.com/plusangel/NTP-client/blob/master/src/ntp_client.cpp

Rust Project on Github

https://github.com/pendulum-project/ntpd-rs/blob/main/ntpd/src/ctl.rs

Device Integration and Stratums

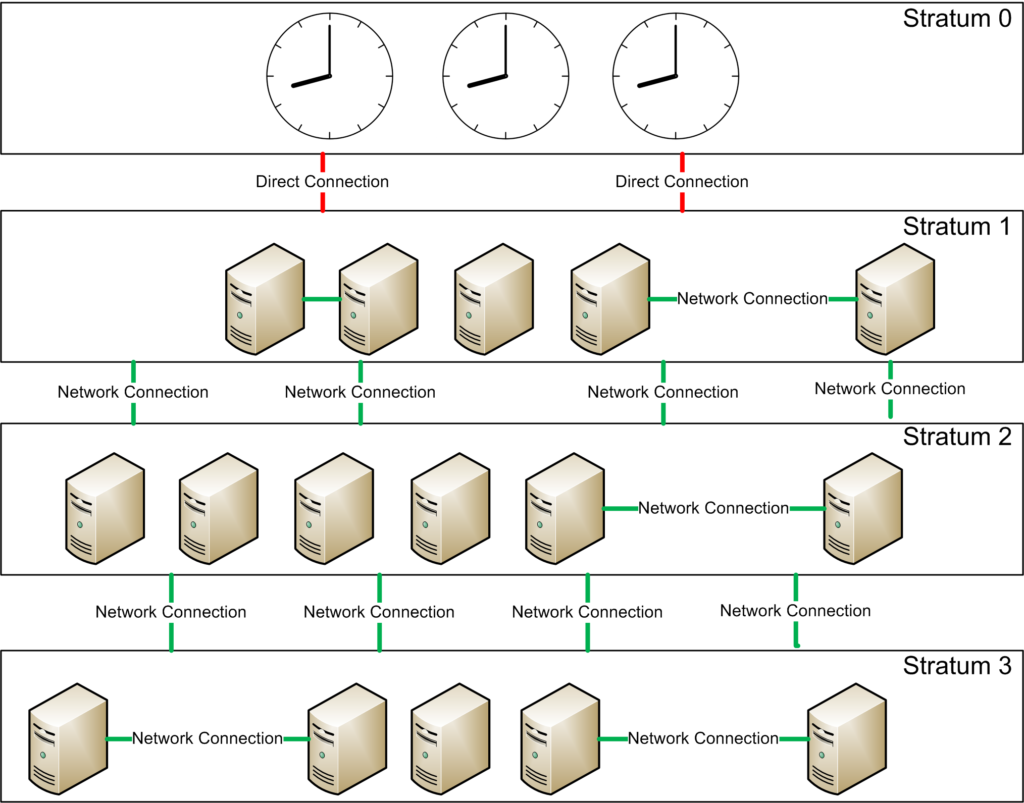
Devices across the spectrum, from personal computers to critical infrastructure, rely on NTP for time synchronization. NTP organizes time sources into strata, where lower strata represent higher accuracy and reliability. Primary servers, directly synchronized to authoritative sources like atomic clocks, reside at the lowest stratum, providing precise time to secondary servers and devices.

NTP server stratum hierarchy

Image Credit : Linux Screen shots . License info

Comparison and Adoption

Compared to other time synchronization protocols like Precision Time Protocol (PTP) and Simple Network Time Protocol (SNTP), NTP stands out for its wide adoption, versatility, and robustness. While PTP offers nanosecond-level precision suitable for high-performance applications, NTP remains the go-to choice for general-purpose time synchronization due to its simplicity and compatibility.

Corporate Giants and NTP Servers

Large companies like Google, Microsoft, and Amazon operate their own NTP servers to ensure precise timekeeping across their global infrastructure. These servers, synchronized to authoritative time sources, serve as beacons of accuracy for millions of devices and services worldwide.

Time for Reflection: The Importance of NTP

Imagine a world without NTP – a world where digital transactions fail, communication breaks down, and critical systems falter due to desynchronized clocks. NTP’s absence would plunge us into chaos, highlighting its indispensable role in modern technology.

An interesting and real scenario where NTP is absent or not accurate which happens at higher strata clock – Imagine two machines, m1 and m2 are exchanging information. Their clocks are not in sync. m1 shows 10:05 am and m2 shows 10:00 am. Now m1 sends some data to m2. If I were to calculate the finite time it took to send this payload then it will be a negative number!

In conclusion, NTP stands as a testament to human ingenuity, enabling seamless synchronization across the digital realm. From its humble origins to its ubiquitous presence in our daily lives, NTP continues to shape the interconnected world we inhabit. So, the next time you glance at your device’s clock, remember the silent guardian working tirelessly behind the scenes – the Network Time Protocol.

NTP stratum 1 servers in the form of robots getting time data from satellites

References:

  • Mills, D. L. (1991). Internet time synchronization: the network time protocol. IEEE Transactions on Communications, 39(10), 1482-1493.
  • Nelson, R., & Mills, D. L. (2010). Chrony: A Different NTP Client. USENIX Annual Technical Conference (USENIX ATC), 175-186.

IPv6 – NDP, SLAAC and static routing

Engineers working on network deployment, maintenance and debugging may feel like being caught in the endless journey transcending between various realms. Fret not, IPv6 deployments are getting easier, and more help is coming !  In the mean time lets understand what is NDP, SLAAC and static routing in IPv6.

Solicited-node multicast address

  • Generated by using the last 6 hex characters from IPv6 address and append it to ff02::1:ff
    • E.g. For a unicast address 2001:1bd9:0000:0002:1d2a:5adf:ae3a:1d00c, the solicited-node multicast address is ff02:0000:0000:0000:0000:0001:ff3a:1d00c

NDP

  • NDP (Neighbor Discovery Protocol) in IPv6 has various functions, one of them is to replace ARP (Address Resolution Protocol) used in IPv4 networks to get the MAC address of a node in the network from the IP address of the node.
    • NDP uses ICMPv6 and solicited-node multicast address for ARP function
    • Unlike ARP, NDP does not use broadcast
    • Two messages are used
      • NS (Neighbor solicitation) = ICMPv6 Type 135
      • NA (Neighbor Advertisement) = ICMPv6 Type 136
  • Instead of ARP table, IPv6 neighbor table is maintained
  • NDP also allows hosts to discover routers on local networks.
    • RS (Router Solicitation) = ICMPv6 Type 133
      • sent to address FF02::2 (routers multicast group)
      • Sent when interface is (re)enabled
    • RA (Router Advertisement) = ICMPv6 Type 134
      • Sent to address FF02::1 (all nodes multicast group) as reply to RS and periodically

SLAAC

  • SLAAC (Stateless Address Auto-configuration) – one of the  ways to configure IPv6 address
    • Node uses RS/RA messages to learn the IPv6 local link prefix
    • Interface ID is then generated using EUI-64 or randomly
An Engineer working on solving a complex IPv6 networking problem about NDP, SLAAC and static routing with a tiger and starwars soldiers guarding

DAD

  • DAD (Duplicate Address Detection) – a function of NDP which a node uses before an IPv6 address is configured on its interface to check if any other node has the same IPv6 address
    • Host sends NS to its own IPv6 address. If there is a reply, it means there is a host with the same address and therefore the host cannot use this IPv6 address.

IPv6 static routing

  • Directly attached static route: Only exit interface is mentioned. Used for point-to-point link that do not need next-hop resolution. Broadcast network like Ethernet not allowed
  • Recursive static route: Only next hop IPv6 address is specified
  • Fully specified static route: Both exit interface and next hop are specified.

Types of IPv6 addresses

IPv6 is gaining traction and is starting to be deployed rapidly. Adding fuel to this fire is advancements in AI / ML , AR / VR, financial markets and other technologies. Below is accurate and exhaustive list of different types of IPv6 addresses and its use

  1. Global Unicast
    • Globally unique public IPv6 addresses usable over the internet.
    • Here are the Global Unicast IPv6 address assignments
  2. Unique local
    • Private IPv6 addresses not usable over the internet (ISP will drop packets)
  3. Link local
    • Automatically generated IPv6 address when the network interface is enabled with IPv6 support.
    • Address starts with FE8 and then interface ID is generated using EUI-64
    • Used for communication within a subnet like OSPF LSAs, next hop for static routes and NDP
  4. Anycast
    • Any global unicast or unique local IPv6 address can be designated as Anycast address
  5. Multicast
    • Address block FF00::/8 used for multicast in IPv6
    • Multicast address scopes
      • Interface-local
      • Link-local
      • Site-local
      • Organization-local
      • Global
  6. EUI64
    • EUI = Extended Unique Identifier. This method allows automatic generation of IPv6 address using MAC address
    • EUI-64 is a method of converting a 48bit MAC address into 64 bit interface identifier
      • Divide MAC address at the midpoint — e.g 1234 5678 90AB can be divided in to 123456 | 7890AB
      • Insert FFFE in middle — 1234 56FF FE78 90AB
      • Invert the 7th bit from the most significant side  — 1234 56FF FE78 90AB becomes 1034 56FF FE78 90AB
    • This 64 bit interface identifier is then used as host portion of a /64 IPv6 address by adding it on to the 64 bit network prefix making a 128bit IPv6 address
  7. :: (two colons)
    • Same as IPv4 0.0.0.0
  8. ::1. (loopback)
    • Same as IPv4 127.0.0.0/8 address range. IPv6 only uses a single address for loopback unlike IPv4

Types of IPv6 addresses